Firebase prod/stage/local Setup for iOS Developers
Firebase has many great features and I use it a lot, but one thing is not that easy with Firebase: A great environment setup and local development including debugging with breakpoints.
I think it’s easy to get started with Firebase. When your app takes off it makes sense to create a more sophisticated approach. But the setup is quite hard and I hope some of you find this text helpful.
After reading this article, you should have the knowledge to create a Firebase setup with production, staging and local environments.
Production Environment
Your prod environment is the easy part. It’s just a plain Firebase project.
Staging Environment
Your staging environment is a copy of prod. Just create a second Firebase project.
To deploy your Cloud Functions to the right environment, follow these instructions from the official docs:
Afterwards, you can use the following commands to switch between your Firebase projects:
firebase use staging
firebase use production
And this is where you might run into some issues: the configuration of your staging and production environments might be different. For example, you might be using Firebase Authentication and therefore need to use different serviceAccountFileNames.
To make this easier, I created a fileadmin.js that takes a Google Cloud project and loads the config based on the project configuration:
To access the database or anything else from the Firebase Admin SDK, use the code below:
const { db, messaging, auth, FieldValue } = require(“./admin”);
For your convenience: You can update just a subset of Cloud Functions instead of everything. You can even chain the Cloud Function names to speed up your deployment.
firebase deploy --only functions:sendFriendRequest
firebase deploy --only functions:deleteFriend,functions:handleFriendRequest
firebase deploy --only hosting
firebase deploy --only functions
firebase deploy --only firestore:rules
Finally, we need to make sure the app uses the right Firebase project.
You can even switch environments at runtime! In one of my apps, I created a hidden menu item in the app that allows testers to switch between environments.
Android developers, keep in mind that this approach will stop Analytics from working as expected.
You can now use your staging environment to roll out new features and get feedback from testers before launching to the public.
Local Environment
Runnin firebase deploy for every little change in a Cloud Function is very time consuming and tedious. Also, debugging Cloud Functions this way is a real hassle.
Wouldn’t it be nice to create breakpoints in your Cloud Functions and have them triggered when you test on a real device? Like in Xcode, but faster? Being faster than Xcode is not a great challenge here but setting up the local environment is a challenge. Let’s get started.
I use VSCode for the Cloud Functions. Create a .vscode directory in the root of the project.
Then, launch the Firebase emulator with this command
firebase emulators:start --import=./testdata --export-on-exit --inspect-functionsWith that, it also saves and loads data (from the testdata directory) into Firestore. The inspect-functions parameters enables support for breakpoints via VSCode.
Now switch to the debug tab of VSCode and click the Debug button:
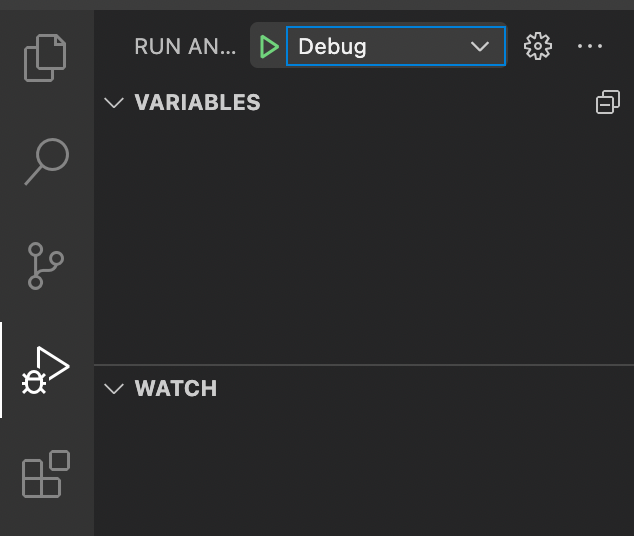
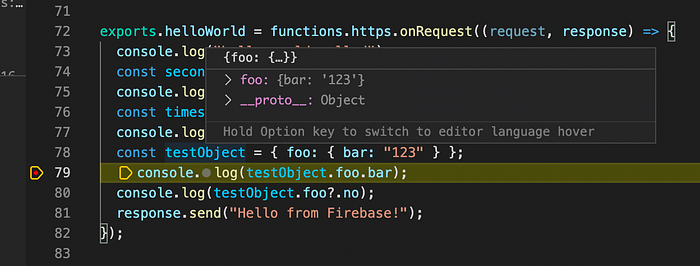
And now, you’ll be able to set breakpoints in your code, inspect variable, and step through the code — just like you would expect!
This works well if you use onRequest and run it in your browser or Postman. The URL looks like this. Replace the project id and maybe also the us-central1 if you picked another one.
http://localhost:5001/[project-id]/us-central1/helloWorldNext, let’s connect an iOS device to our local environment! Add this to your AppDelegate:
Make sure that the device is in the same network as the emulator. When you option-click on the Wifi symbol (on a Mac) it shows your current IP address.
However, there are some gotchas with the code for iOS.
- Auth only takes the IP address and the port separately
- Firestore takes the IP address in combination with the port
- Functions takes the IP address (but it needs to start with
http) and the port separately. What’s more, thefunctionssingleton tends to forget theuseEmulatorsetting so you have to calluseEmulatormethod before each usage.
I added the helloWorld2 call to test if the setup works. Notice the difference between onCall and onRequest . The first can only be used from the client SDKs, the latter can be called by a URL in a browser.
We are not done yet… the emulator uses localhost as host and don’t accept calls from a physical device. To fix the routing add this to your firebase.json
The setup is now complete. To start coding and debugging, follow these steps:
- Select the environment. For example,
firebase use staging - Run the Firebase emulator suite:
emulators:start — import=./testdata — export-on-exit — inspect-functions - Attach the debugger inside VSCode
- Start your iOS app
You should now be able to use the iOS app on your device using the Firestore emulators. Everything works just like if you are using your staging or production environment — even authentication works. At least for Phone Number Auth and Email/Link Login. Check the emulator console output for the SMS code or the email signup link.

